In the world of data visualisation, Looker Studio stands out as a powerful tool for creating interactive reports and dashboards. But what really takes your data storytelling to the next level? Custom expert commentary annotations. They’re the secret sauce that adds your insights right where they are needed.
I’ve seen firsthand how expert commentary annotations can transform a good report into a great one. They provide context, highlight key insights, and guide viewers through the narrative of the data. As Aleyda Solis once joked it in a conference talk – personalised reports are much better than a bland metrics-only dashboard.

What are Expert Commentary Annotations?
Custom expert commentary and annotations are my go-to tool for adding insights to Looker Studio dashboards. They’re text labels or graphical markers that are placed on charts or graphs to denote specific points of interest or to comment on data trends. Unlike automatically generated labels, they give you the freedom to emphasize the nuances that might otherwise go unnoticed.
These annotations aren’t just a visual aid; they transform raw data into a narrative that speaks volumes. From flagging an anomaly to indicating a milestone, custom annotations serve as my narrative bookmarks amidst a sea of numbers.
The purpose of custom annotations is multifaceted. They’re designed to:
- Provide context: Giving life to numbers by tying them back to real-world events or decisions.
- Highlight significant data points: Sometimes, a data spike or drop demands attention and a custom annotation ensures it doesn’t get lost in the shuffle.
- Direct viewer focus: Annotations act as a guide, leading my audience’s eyes to the critical parts of the data story I’m telling.
- Clarify complexities: With these, I can explain intricate data in layman’s terms, making insights accessible to all viewers.
- Trigger action: By pointing out trends and outcomes, I can nudge stakeholders towards informed decision-making.
Incorporating custom annotations is about adding my voice to the visual conversation. They’re how I remind viewers that behind every data point, there’s an expert analysing, interpreting, and providing context. And in Looker Studio, applying these annotations is a seamless process that complements the platform’s interactive capabilities.
How to add custom annotations for expert commentary for GA4 data in Looker Studio dashboards
Adding custom annotations for expert commentary can significantly enhance the insights derived from your GA4 data. In Looker Studio, the process is straightforward and allows for a high degree of personalisation of your dashboards.
Step 1: Customize the Commentary Template for Google Sheets
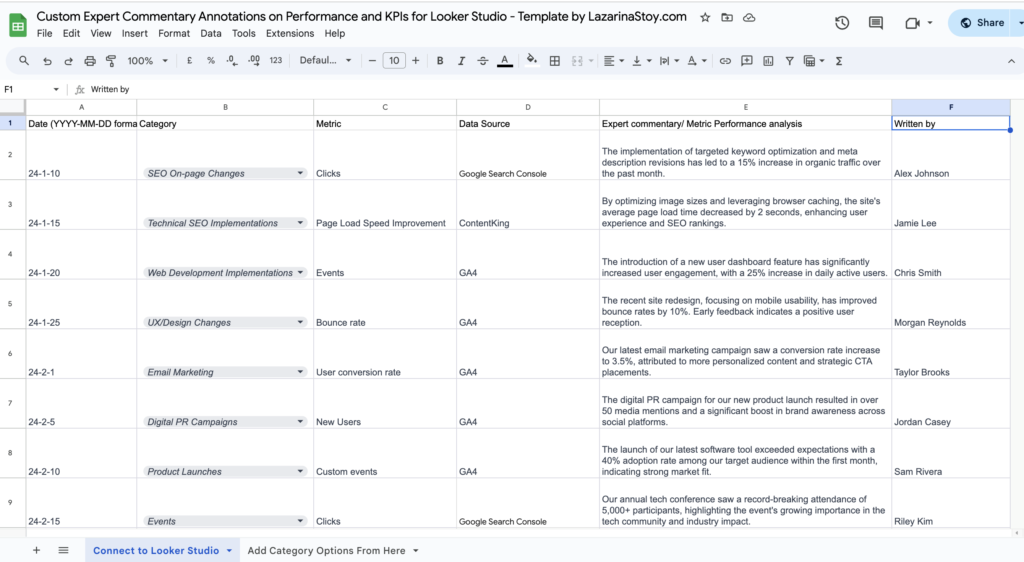
The first step is to prepare a commentary template in Google Sheets. Create a structured template where each annotation corresponds with specific data points or metrics from your reporting. My template typically includes the following columns:
- Date – the date when the commentary entry was added, preferrably in YYYY-MM-DD format to ensure compatibility with Looker Studio
- Category – of the commentary, based on team or project
- Metric – metric, to which the commentary pertains
- Metric Source – source of the metric, to which the commentary pertains
- Commentary – expert commentary, written by a consultant
- Written by – who wrote the commentary

I ensure that each entry is concise and directly related to the data. This preparation makes integration into Looker Studio seamless.
If you want to jump-start the process, make a copy of this Custom Expert Commentary Annotations on Performance and KPIs for Looker Studio
Template by LazarinaStoy.com
Step 2: Import in Looker Studio and Blend with GA4
After finalizing my annotations in Google Sheets, import the sheet into Looker Studio. The platform allows you to blend this data effortlessly with existing GA4 data (can also be any other data source you’re reporting on, like Google Search Console, or Google Ads). Here’s the process:
- Navigate to an existing Looker Studio dashboard or create a new one
- Select ‘Add Data’ to incorporate my Google Sheets template, and add any additional data you’d like to display
- Once added, blend the GA4 data with my annotations by ensuring that the reference points match perfectly.
This step is crucial as it marries the quantitative data with my qualitative expertise, providing a richer analysis. Here are some things to keep in mind:
- Use the ‘Date’ fields as join keys, using left outer join with GA4 being the first table to align the commentary with the corresponding performance metrics.
- Add all of the metrics form GA4, for which you’ve added the expert commentary
- For less, reported on data sources, where you want to display the commentary but don’t need to show in-chart annotations just the date and the note, you can skip the data blending.
Step 3: Create Visualisations for Your Data
With your data blended, you can move on to creating visualisations. Choose visualisations that allow for easy integration of custom annotations, such as:
- Time series
- Bar graphs
- Line charts
I focus on visual clarity, ensuring that my charts are not overcrowded so that my annotations stand out and the message remains clear.

Step 4: Add the Expert Commentary and Annotations to Support the Data
Adjust the chart settings to include the expert commentary annotations. This might involve customising the chart’s ‘Setup’ and ‘Style’ tabs to display the annotations effectively alongside the performance data.
Consider adding additional visualizations, such as scorecards for key metrics or tables listing the expert commentary, to complement the annotated charts. These can help highlight the insights provided by the experts and make the dashboard more informative.
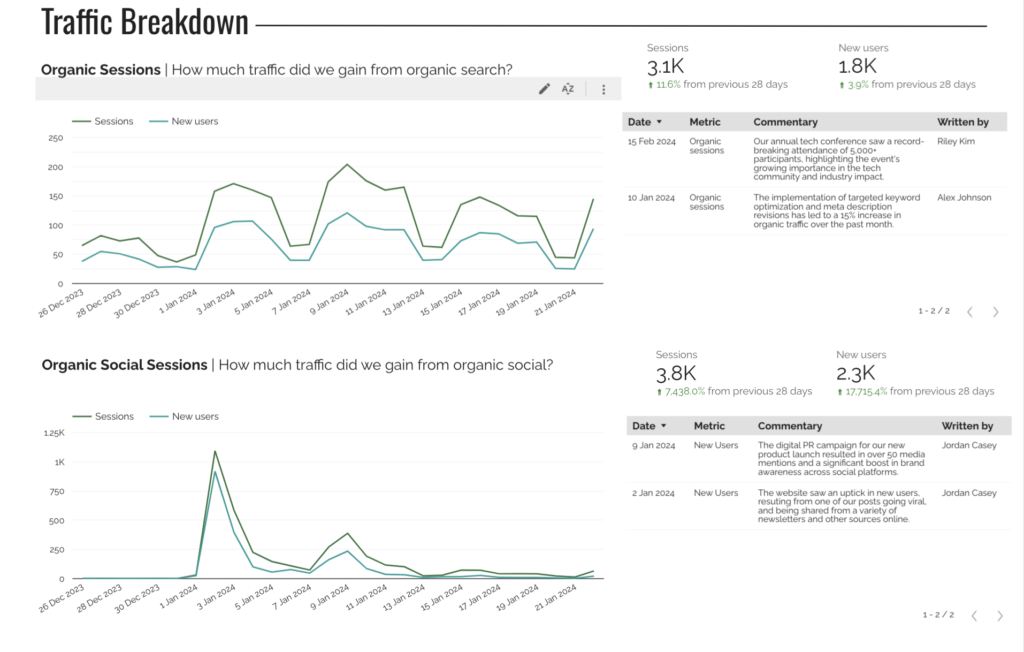
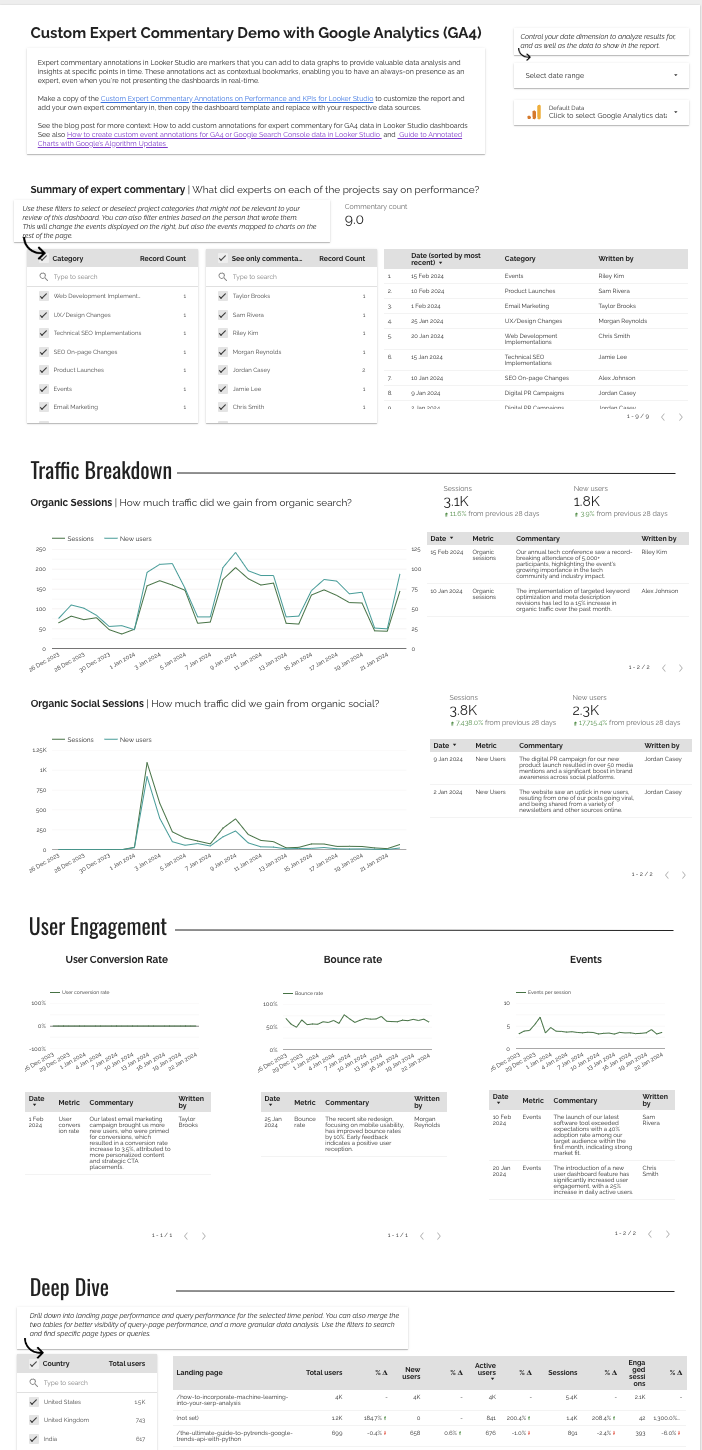
Here’s how a complete sample page might look like, which displays metrics from Google Analytics GA4, as well as in-chart annotations and expert commentary next to key metric’s charts.
incorporate dynamic expert commentary in Looker studio dashboards
leave no questions unanswered with always-on expert commentary dashboards
I created this Looker Studio template to help you better visualize how to add expert commentary to your Looker Studio dashboards, turning them from a data reporting to data storytelling medium

Best practices for writing short expert commentary for annotations in Looker Studio
Analyze and Enhance, Don’t Report the Data
When it comes to adding expert commentary in Looker Studio, it’s crucial to go beyond merely reporting what the data shows. Interpretation is key. Look for ways to dive deeper, offering insights that might not be instantly obvious. For instance, if there’s a spike in traffic, I don’t just state the fact that clicks rose by 10% (as this is obvious by the other visualisations on the dashboard). Instead provide commentary and context on potential causes, like a successful marketing campaign, and suggest how to replicate this success in the future. Remember, viewers can see the numbers; your job is to help them understand the why and how.
Providing Relevant Context
Adding context to the annotations makes a world of difference. Make sure your commentary provides a backdrop that enriches the viewer’s understanding. This might involve:
- Industry benchmarks: Showing how the data stacks up against known standards or competitors.
- Related events: Highlighting any external events that could have influenced the data, such as a viral social media post or a change in search engine algorithms.
By weaving in this context, the story behind the numbers becomes clearer and more compelling.
Provide Commentary on a Regular Basis
To keep the dashboard dynamic and relevant, I advocate for regular updates to the commentary. This doesn’t mean altering annotations that are entered but rather providing fresh insights when there are notable changes or trends. Staying on top of the data ensures that everyone who relies on the dashboard receives the most Current and Actionable information. Consistent updates contribute to an ongoing narrative that can greatly improve strategic decision-making over time.
Periodically update the Google Sheets template with new expert commentary as performance trends evolve or as additional insights become available. Make sure your clients know when to expect new insights to be added, and also ideally – insert a note in the dashboard as a reminder for this, too – e.g. ‘New expert insights added on the first and third Monday of each month’.
Why Incorporate Expert Commentary Annotations in Looker Studio?
Enhanced Collaboration
When working on data analysis, collaboration between team members is essential. Custom annotations in Looker Studio serve as a robust tool for this collaboration. By allowing multiple analysts to add their insights directly onto the dashboard, these annotations foster a more cohesive and interactive analysis process. For instance, when I notice a spike in website traffic, I can quickly annotate this observation, and the rest of my team can build upon it with their expertise. This interactive environment ensures that everyone’s informed insights contribute to a deeper understanding of the data.
Centralized Knowledge Base
Annotations in Looker Studio go beyond simple commentary; they create a Centralised Knowledge Base. By capturing expert commentary directly within the dashboard, historical decisions and insights become part of the visualisation itself. This means that over time, I’ve seen dashboards evolve into comprehensive records of analytical thought processes – a treasure trove of organisational knowledge. With custom annotations, future analysts or team members can understand the ‘why’ behind past trends and decisions, thus avoiding repetitive analysis or missed connections.
Streamlined Communication
Another key advantage of using custom annotations is Streamlined Communication. Annotations can replace lengthy email chains or disconnected notes spread across various platforms. By integrating these directly into Looker Studio dashboards, you ensure that commentary is specific, actionable, and directly linked to the data it refers to. This results in a more efficient workflow as your clients and stakeholders don’t need to sift through external documents – the relevant information is readily available where it’s needed most – right there in the dashboard, once again emphasizing the right context for faster and more accurate decision-making.
Additional examples of Custom Annotations in Looker Studio
Annotation for Google Algorithm Updates
When working with data in Looker Studio, it’s vital to indicate when external factors might influence your analytics. One clear example is noting Google Algorithm updates. These updates can drastically impact a website’s search engine rankings, and consequently, organic traffic data. By adding custom annotations directly onto a Looker Studio report, I’m able to pinpoint the exact date of an algorithm change, ensuring that stakeholders understand any fluctuations in metrics.
See how to do this in detail in the post Step-by-Step Guide to Annotated Charts with Google’s Algorithm Updates in SEO Looker Studio reports
Annotations for Important Project Milestones and Events
Annotations are not just for external events; they are equally useful for marking internal project milestones and events. By adding custom event annotations to Looker Studio reports, I create a narrative that accompanies the visual data, thereby reflecting the continuity or change as a result of these milestones.
Learn how to do this in the article linked: How to create custom event annotations for GA4 or Google Search Console data in Looker Studio, and the associated Google Sheets template, and Looker Studio Template.
The use of annotations for marking these internal events ensures that the impact of project efforts is clearly communicated and understood within the context of the data presented.
Recap
Harnessing the power of custom annotations in Looker Studio has never been more crucial for data storytelling. I’ve shown you how to seamlessly blend expert commentary with GA4 data to create dynamic dashboards that not only inform but also engage. Remember to keep your annotations concise and relevant to maintain a clear narrative. By doing so you’ll not only enhance collaboration but also build a robust knowledge base right within your analytics environment. With these tools at your disposal you’re well-equipped to elevate your data visualization and make your insights truly resonate.
Want to learn more ways to add value in your dashboard via data storytelling?
Check out these resources 👇🏻
10 Common Data Storytelling Mistakes and How to Avoid Them
Six Practical Ways to Implement Data Storytelling in your Consulting
What is Data Storytelling – Skills Needed, Elements, and Checklist to build Data stories in marketing
Frequently Asked Questions on expert commentary annotations in Looker Studio
How do you add custom annotations in Looker Studio?
To add custom annotations in Looker Studio, customise a commentary template in Google Sheets, import it into Looker Studio, blend it with the desired data (e.g. GA4, Search Console, or even Google Ads), and then create visualizations where you can add text and shapes for annotations.
Why is it important to add expert commentary annotations in Looker Studio dashboards?
Annotations provide expert commentary and insights directly in the dashboards, guiding viewers through the story behind the data. They enhance collaboration, create a centralized knowledge base, and improve communication by directly integrating expert knowledge.
What are the best practices for writing expert commentary for annotations in Looker Studio?
Best practices include analysing the data to enhance its value, providing relevant context to the viewer, and updating the commentary regularly. This keeps the dashboard dynamic and maintains relevancy with fresh insights.


